MySQL 8 InnoDB flow Architecture with related variables

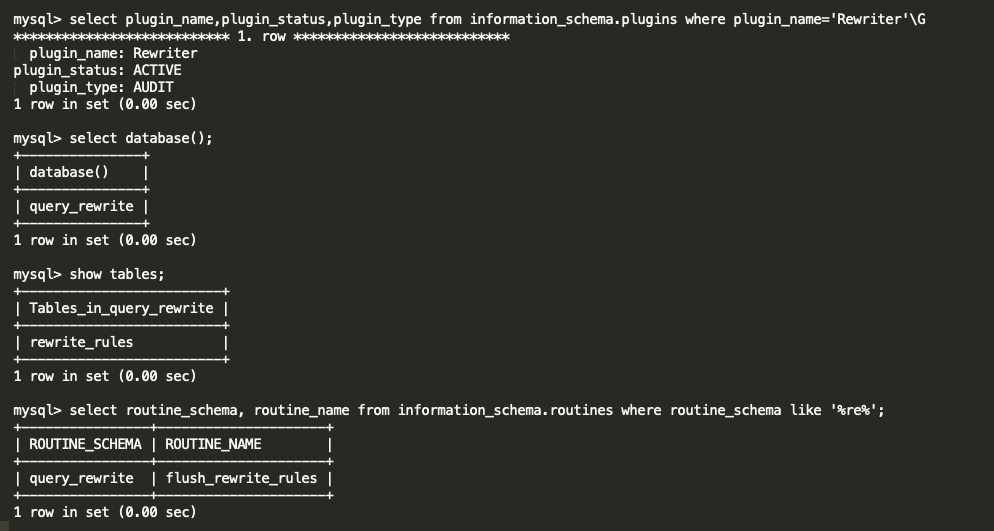
In this blog, I am going to share the MySQL 8 InnoDB architecture diagram with related variables . From the MySQL official document I have seen some InnoDB variables related to MySQL 8.0.20 . The architecture has been prepared based on that . Also, I am providing the variables list which used in this diagram and its respective versions .

MySQL 8 InnoDB Architecture :

  • For understand the diagram better , I have added some old variables as well ( sync_binlog / innodb_log_buffer / innodb_flush_log_at_trx_commit / innodb_flush_method etc .. )
  • I have marked the MySQL 8 variables with yellow colour .

MySQL 8 variables :

Conclusion :

Few months back, I have released the MySQL 8 architecture diagram . But, the image quality is very low . So, some peoples personally asked me to send the original image through email . But, unfortunately I don’t have that. So, I had the plan long time to draw the diagram again and release it in my website. It Happens now 🙂 . Also, the current diagram have some modifications as well . Thanks to everyone , who encouraging me to draw this diagram again . I will be come up with my next blog as much as possible .

Thanks !!!

Promotion:

If you are looking any MySQL related training or support, you can reach me on following details.

email: hercules7sakthi@gmail.com
LinkdIN: https://www.linkedin.com/in/sri-sakthivel-m-d-68abb8112/

MySQL Query Rewritten plugin now supporting DELETE / INSERT / UPDATE / REPLACE

MySQL has the inbuilt query rewritten plugin for rewrite the SQL statements which received by the server before execute them .

  • Before MySQL 8.0.12 , the query rewritten plugin only supports for SELECT’s
  • From MySQL 8.0.12 , the query rewritten plugin will supports for INSERT , REPLACE, UPDATE, DELETE , SELECT .

One of our customer had the performance issue with the DELETE statements for particular table . The issue was happened after the new code deployment . In this blog, I am going to explain the implementation of the MySQL query rewrite plugin and how we overcome the issue using the MySQL query rewritten plugin .

MySQL Query rewritten plugin Implementation :

MySQL provides two SQL files for the installation / Uninstallation purpose . The files will be located under the directory “lc_messages_dir”

  • The file install_rewriter.sql for the installation purpose .
  • The file uninstall_rewriter.sql for the uninstallation purpose .

Once you loaded the file “install_rewriter.sql” , it will create a separate database / table / procedure for the query rewritten rules management .

database : query_rewrite

table : rewrite_rules

procedure : flush_rewrite_rules

Table structure :

  • The SQL rewritten rules needs to be configured on the table “rewrite_rules” .
  • Based on the query rules the server will rewrite the query .
  • All the columns have their own purpose .

Example :

Here is the simple example with query rewritten plugin .

pattern : SELECT ?

replacement : SELECT ? + 1

Hope this make sense !!

Note : It is always need to call the procedure “flush_rewrite_rules” . whenever you modified the rules table .

My problem statement with DELETE :

  • Last Friday One of our client had the new code deployment .
  • With the new code they mistakenly mentioned the UPPER function on one of the DELETE statement , actually which is not required .
  • So, the query was not able to use the INDEX as the function prevents the INDEX usage .
  • The table had around 30M records
  • Unfortunately modifying the code without UPPER case is not possible that time .

Fix : We have provided the fix by using the MySQL query rewritten plugin by adding the rules without the UPPER function .

It is restricted to share the production data , so I have reproduced the same issue at my local environment with less data .

Experiment at my local :

Created the table “jc_rewritten” and inserted some records .

DELETE with UPPER function ,

Here you can see the UPPER function is blocking the index for column “f_id” and the query doing FTS ( Full Table Scan ) . It is very painful for 30M table .

DELETE without UPPER function ,

Without UPPER function, the query is using the optimal index and does direct look up . It is very very fast .

Both the query will affect the same data ,

So, we have made the Query rewritten rule like below ,

just we are removing the UPPER function as it is not required .

After activated the query rule the SQL is running fine as expected . And, our performance issue was fixed .

You can see the warning message as how the server changed the query . Below is the logs from GENERAL query log ,

Conclusion :

Some of the database tools ( i.e. ProxySQL ) have more features on this Query rewritten topic . MySQL inbuilt query rewritten plugin recently ( from MySQL 8.0.12 ) supporting for DELETE’s , UPDATE’s , INSERT’s . And, it helps a lot to solve our production issue . Expecting more features on upcoming versions . Special Thanks to MySQL community Team !! I will be come up with my next blog as much as possible .

Thanks !!

MySQL ERROR log with JSON format | MySQL Components

MySQL have the nice feature, which helps to write the error log with JSON format . This can be achieved through the MySQL components . In this blog, I am going to show the complete walkthrough involved in this process .

What is MySQL component ?

from MySQL document ,

MySQL Server includes a component-based infrastructure for extending server capabilities. A component provides services that are available to the server and other components. (With respect to service use, the server is a component, equal to other components.) Components interact with each other only through the services they provide.

Link : https://dev.mysql.com/doc/refman/8.0/en/server-components.html

How to enable the JSON logging ?

Step 1 : ( Installing the component ) :

First step, we need to install the component “component_log_sink_json” .

cmd :

install component ‘file://component_log_sink_json’;
select * from mysql.component where component_urn like ‘%json%’\G

There is a table “mysql.component” , which will helps to obtain the status of the MySQL components .

Step 2 : ( Enabling the JSON service ) :

There are few services, which helps to design the error log format. The services based on the filter or sink . The variable “log_error_services” will helps to enable the required services .

Available services :

  • log_filter_internal ( filter )
  • log_filter_dragnet ( filter )
  • log_sink_internal ( sink )
  • log_sink_json ( sink )
  • log_sink_syseventlog ( sink )
  • log_sink_test ( sink )

For our purpose , I am going to enable the services “log_filter_internal” and “log_sink_json”

log_filter_interval : Implements filtering based on log event priority and error code, in combination with the log_error_verbosity and log_error_suppression_list system variable

log_sink_json : Implements the JSON logging in error log

cmd :

set global log_error_services = ‘log_filter_internal; log_sink_json’;

From the above screenshot, you can see the new file ( mysql.err.00.json ) was created , when I enabled the JSON service .

I have manually created a error log event for testing purpose ( by executing the wrong command ) ,

Yes, it is working well !!

Make sure to have the variable ( log_error_services) entry in the MySQL configuration file ( my.cnf ) as well . You can also use the SET PERSIST .

Note : The log directory should have the proper privileges .

How to uninstall the JSON component ?

You cannot simply uninstall the component by using the UNINSTALL COMPONENT command . You need to first remove the JSON service from the variable “log_error_services” . Then only the mysqld will allow you to perform the UNINSTALL COMPONENT command .

cmd :

uninstall component ‘file://component_log_sink_json’;
set global log_error_services=’log_filter_internal; log_sink_internal’;

Conclusion :

MySQL ERROR log will not contain any additional information with JSON format . But, you will have the name of each columns ( Time : xxxxxx , err_code : xxxx ) . And, the view is better . Hope this blog will helps to someone who loves JSON . I will coup with my next blog as much as possible .

Thanks !!!

MySQL Client program | Some interesting features

As a MySQL database administrator, we all using the MySQL client program for communicate to MySQL Server . Maximum the client program is used to execute the SQL’s, monitor the traffic and modify the variables . MySQL client program has some good features which can helps to make our work easier . In this blog I am going to explain some MySQL client program features which impressed me .

  • Execute the OS commands inside the MySQL client program
  • Create / Execute the SQL file inside the MySQL client program
  • Query output with XML and HTML languages
  • MySQL client program for learning MySQL commands .
  • Pager with MySQL client program
  • Safe UPDATE / DELETE with MySQL client program
  • Define the maximum number of rows in result set ( SELECT’s )

Execute the OS commands inside the MySQL client program :

Yes, It is possible to execute the OS commands inside the MySQL client program . There is no need to come out from your MySQL terminal for execute the OS commands .

syntax : system <command name>

Create / Execute the SQL file inside the MySQL client program :

Yes, It is possible to create and execute the bunch of queries from SQL file . We can achieve this by using the command edit ( \e ).

syntax : edit

save the file using ” :wq!”

After save the file , put semi colon (;) and you can see the queries are executed .

Query output with XML and HTML languages :

Yes, We have the option to display the result set with different languages like XML and HTML. The output files can be used for their own purposes like sending the email with HTML output etc …

for XML ,

syntax : mysql –xml

for HTML,

syntax : mysql –html

MySQL client program for learning MySQL commands :

MySQL client program provides the help command with the option contents for the learning purpose . This is very helpful for learning the MySQL commands ( like Manual ) .

syntax : help contents

Here I have Chosen the Utility and EXPLAIN part from Utility .

Pager with MySQL client program :

The most common usage of pager is to set it to a Unix pager such as MORE,LESS,CAT . The below blog have the nice examples about the MySQL pager command .

https://dzone.com/articles/fun-mysql-pager-command

syntax : pager <command>

pager for ignoring the particular command Query ,

pager for only print the particular command Query ,

pager for discard the result sets ,

Safe UPDATE / DELETE with MySQL client program :

MySQL client program provides the option “–safe-updates” . If this option is enabled, UPDATE and DELETE statements that do not use a key in the WHERE clause or a LIMIT clause produce an error.

Here the column batch_id don’t have the INDEX . Now, I am going to enable the ” –safe-updates ” and perform the UPDATE/DELETE based on the column batch_id=103 ( which don’t have index ).

Not working because the “–safe-updates” flag prevents .

Define the maximum number of rows in result set ( SELECT’s ) :

We can define the automatic number of rows limit for SELECT statements when using –safe-updates.

example :

From the above example, it returns now row as per the configuration ( –select-limit=1 ) .

I hope every MySQL DBA has learned this things when they started their career with MySQL . Now, modern day we have the advanced client programs like “MySQL shell” . My personal intention of this post is to spread the good things of MySQL client program , because I personally love it lot . Hope this post helps someone, who is started to learn the MySQL .

Thanks !!!

Is your InnoDB transactions are completely Atomicity ( ACID ) by default ?

The blog title seems something crazy ?

Yes, by default your InnoDB transactions don’t have the Atomicity . But, you can control the atomicity of your InnoDB transaction with the variable innodb_rollback_on_timeout. We had a weird data inconsistency issue within the transaction . In this blog , I am going to explain “How it will happen?” and “How it can be fixed ?” .

Whats is Atomicity ?

From Wiki ,

Transactions are often composed of multiple statements. Atomicity guarantees that each transaction is treated as a single “unit”, which either succeeds completely, or fails completely: if any of the statements constituting a transaction fails to complete, the entire transaction fails and the database is left unchanged.

What is Innodb_rollback_on_timeout ?

From MySQL documentation,

InnoDB rolls back only the last statement on a transaction timeout by default. If –innodb-rollback-on-timeout is specified, a transaction timeout causes InnoDB to abort and roll back the entire transaction.

Here the transaction timeout will be happen based on the “innodb_lock_wait_timeout” setting .

All good, now we can experiment how it is working practically .

Experiment 1 ( Innodb_rollback_on_timeout = OFF )

I have created two MySQL client sessions ,

session 1 :

  • innodb_rollback_on_timeout=OFF
  • innodb_wait_timeout=50
  • Started a transaction
  • Ran the UPDATE to set name=’christ’ where id=1 ( not COMMIT )

now I am going to lock the second row ( id=2 ) at different session ( session 2 )

session 2 :

  • Started the transaction at session 2
  • Ran the UPDATE to set name=’sri’ where id=2 ( not COMMIT )

Now, I am going to update the same id = 2 at session 1 , so that it will exceed the innodb_lock_wait_timeout and the statement will fail .

session 1 :

  • Trying to access the row ( id=2 ) through the UPDATE
  • The UPDATE was failed with lock wait timeout because the session 2 is already hold that row .
  • Triggered the COMMIT

But after commit the transaction,

My first UPDATE was committed even the second statement was failed . You can see the output from the screenshot .

Sounds like ATOMICITY is missing ?

Lets do the second experiment …

Experiment 2 ( Innodb_rollback_on_timeout = ON ) :

I am going to repeat the same procedure with innodb_rollback_on_timeout=ON,

session 1 :

started the transaction and updated the row id=1

session 2 :

locking the row id=2

session 1 :

Creating the lock wait timeout inside the transaction and committing the transaction .

No changes happened . Make sense ?

With innodb_rollback_on_timeout = ON , Both the statements were not committed and the complete transaction has rolled back . THE ENTIRE TRANSACTION HAS ROLLBACK . So, this is the exact Atomicity right ?

Note : Changing the innodb_rollback_on_timeout requires the MySQL restart .

Hope this blog helps to understand the variable innodb_rollback_on_timeout . The blog proves, Having the innodb_rollback_on_timeout = ON provides the perfect/complete atomicity on your InnoDB system .

Thanks !!!

Galera Replication flow Architecture

Galera is the best solution for High Availability, It is being used by many peoples world wide . Galera is doing synchronous replication ( really it is Certification based replication ) to keep update the data on group nodes . In this blog I have explained about “How the Galera replication works?” . For the better understanding, I have made an architecture diagram to describe the replication flow . I have also provided the explanation for the key words which has used in the architecture diagram .

Architecture flow Diagram :

What is writeset ?

Writeset contains all changes made to the database by the transaction and append_key of the changed rows .

What is append_key ?

Append_key registers the key of the changed data by the transaction. The key for rows can be represented in three parts as DATABASE NAME, TABLE NAME, PRIMARY KEY .

If the table don’t have the PRIMARY KEY, the HASH of the modified data will be the part of the writeset .

What is Certification in Galera ?

Certification in Galera will be performed to detect the conflicts and the data consistency among the group . It will be performed before the transaction comiit .

What is CVV ( Central Certification Vector ) ?

CVV is used to detect the conflcits . The modified keys will added in to the Central Certification Vector. If the added key is already part of the vector, then conflict resolution checks are triggered.

Hope this blog will helps someone, who is working with Galera Cluster . I will be come up with my next blog soon .

Thanks !!!

ProxySQL Config file creation | Backup solution

We are well aware that ProxySQL is one of the powerful SQL aware proxy for MySQL. The ProxySQL configuration is flexible and the maximum part of configurations can be done with the ProxySQL client itself.

The latest ProxySQL release ( 2.0.9 ) has few impressive features like “SQL injection engine, Firewall whitelist, Config file generate” . In this blog I am going to explain, how to generate the ProxySQL config file using the proxySQL client .

Why configuration file ?

  • Backup solution
  • Helpful for Ansible deployments in multipul environments

There are two important commands involved in the ProxySQL config file generation.

  • Print the config file text in ProxySQL client itself ( like query output )
  • Export the configurations in separate file

Print the config file text in ProxySQL client ( like query output ) :

cmd : SELECT CONFIG FILE ;

Export the configurations in separate file :

cmd : SELECT CONFIG INTO OUTFILE /path/config

Below is the bash script , which will helps to backup the ProxySQL configuration . It can be schedule in the cron with convenient time .

Script :

[root@ip-172-31-8-156 ProxySQL]# cat backup.sh
#!/bin/sh

#variable

backup_path="/var/lib/ProxySQL_backup/data"
user=admin
pass=admin
port=6032
host=127.0.0.1
back_name=ProxySQL_backup_$(date -u +%Y-%m-%dT%H-%M-%S)
log_path="/var/lib/ProxySQL_backup/log"

#live_check

ProxySQL_livecheck() {
if [[ $(pgrep proxysql) ]]; then 
      ProxySQL_Backup 
else 
      echo "Backup ( $back_name ) failed" >> /var/lib/ProxySQL_backup/log/backup.err 
      exit 
fi
}

#backup

ProxySQL_Backup() {
mysql -u$user -p$pass -P$port -h$host -e "select config into outfile $backup_path/$back_name" 

echo "Backup ( $back_name ) completed" >> /var/lib/ProxySQL_backup/log/backup.log
}

#call
ProxySQL_livecheck

Thanks !!!

MySQL Table can have the WASTED/FRAGMENTED space without data deletion ( DELETE ) ?

  • Are thinking the table fragmentation will be happened with only DELETE’s ?
  • Do you believe the INSERT’s will also cause the table fragmentation ?

Yes, INSERT’s with the ROLLBACK can also create the table fragmentation . In this blog I am going to explain how the INSERT is causing the table fragmentation .

How the table fragmentations is happening with INSERT and ROLLBACK ?

When you triggered the INSERT, it will start to write the data into it’s table space file ( .ibd ) . Right ?

From the snap, I have created the table and started the transaction ( BEGIN ) with INSERT . Within the transaction the INSERT has been completed but still I did not commit / rollback the transaction .

You can check the table space file growth to 1.2 GB .

Now, I am going to rollback the transaction .

After the ROLLBACK completed, still the table space file size is 1.2 GB ( disk space is not reduced ). You can see the table don’t have any records at COUNT(*) section .

Make sense ?

Now, I wanted to check the table fragmentation . The usual query with INFORMATION_SCHEMA.TABLES will not give the exact fragmentation size . There is a nice article by Mr. Frederic Descamps to calculate the fragmented / wasted disk space . The query which used in the article will additionally use the IINFORMATION_SCHEMA.NNODB_TABLESPACES table .

Query :

SELECT NAME, TABLE_ROWS, format_bytes(data_length) DATA_SIZE,
format_bytes(index_length) INDEX_SIZE,
format_bytes(data_length+index_length) TOTAL_SIZE,
format_bytes(data_free) DATA_FREE,
format_bytes(FILE_SIZE) FILE_SIZE,
format_bytes((FILE_SIZE/10 – (data_length/10 + index_length/10))*10) WASTED_SIZE
FROM information_schema.TABLES as t
JOIN information_schema.INNODB_TABLESPACES as it
ON it.name = concat(table_schema,”/”,table_name) WHERE t.table_schema=’jc’ and t.table_name=’test_frag_Ins’;

So, now I need to rebuilt the table for recover the disk space ?

Yes, recovered the disk space . 🙂

Is the fragmented disk space is re-usable ?

Yes, it is re-usable , the below example will explain it .

From the above snap, first I have created the fragmented space ( 1.2 GB ) with INSERT/ROLLBACK . Then again I ran the same INSERT but this time committed the transaction . Still the disk space is same 1.2 GB .

Make sense ? 🙂

Hope this blog gives some additional information and it helps to understand the table fragmentation in MySQL !!

Thanks !!!

MySQL performance benchmark ( with/without binary log )

Recently I had the discussion with one of my colleague about the impact of MySQL binary logs . It was a nice discussion and triggered me further to benchmark the MySQL with/without binary logs . The result is amazing 🙂

Server configuration :

  • 4 CPU
  • 8 GB RAM
  • 100 GB SSD

MySQL version : 8.0.19

I have conducted the test with a bulk transaction . It is a single thread INSERT with 9.5 GB of data .

Test 1 – With binary log :

screen 1 :

from the screen 1, I had split my terminal to three screens .

1st screen : I have triggered the bulk INSERT

2nd screen : The INSERT has started to execute and in executing state .

3rd screen : You can see the individual table-space file ( .ibd ) keep growing ( 5.6 GB ) on executing state .

screen 2 :

from the screen 2 ,

  • When the executing state completed, the .ibd growth reached to 9.5 GB ( all the transaction data has been written into table-space )
  • After executing state, the transaction data needs to be written into binary logs before commit .
  • Mysqld/OS ( based on sync_binlog ) has started to write the events into binary log . That time the query state is “waiting for handler commit” in process list .
  • Once all the events are written into binary logs, the query has completed .

Total Query Execution time with binary logs : 10 minutes 35 seconds

After this testing, I have truncated the table and restarted the MySQL with skip-log-bin .

Note : Before restart I have disabled the variables innodb_buffer_pool_dump_at_shutwon , innodb_buffer_pool_load_at_startup

Test 2 – Without binary log :

As per the experiment 1 ,

Here also the query took same time for executing the statement .

But, no huge time on the “waiting for handler commit” state , because we have disabled the binary logging . So it did not take long time to commit the transaction .

Total Query Execution time without binary logs : 6 minutes 27 seconds

Conclusion :

  • Binary logs will heavily affect the performance when the transaction size is huge
  • Performance Impact is less in small transactions
  • With STATEMENT based binary logging there is very very less performance impact ( but STATEMENT based logging is not good for production / replication )
  • I have seen that, some peoples are using the HDD disk for binary logs and SSD disk for MySQL data directory. It will surely impact the performance when the transaction size is huge .
  • Possibly, would suggest to make the setting binlog_row_image to MINIMAL . Still, it will not helps much during the heavy INSERT’s .
  • Binary logs are important to PITR .

Thanks !!

Monitoring MySQL using MySQL Shell ( \show & \watch )

We know the MySQL Shell is the advanced client tool for communicate to the MySQL server . MySQL Shell has lot of features like InnoDB Cluster control , InnoDB ReplicaSet, MySQL Shell utilities , MySQL server management etc … Today I came to know, MySQL shell helps lot in monitoring as well ( query, threads, resource consumption , locking ) .

In this blog I am going to explain how to use the MySQL Shell for monitor your server .

MySQL Shell provides two hot commands \show and \watch for monitor the MySQL server and report generating purpose .

\show : Execute the report with the provided options

\watch : Execute the report in loop with provided options

\show with thread example :

\show with query example :

You can execute any query within the double quotes .

\show with threads example :

As I showned in the screenshot there are two types in threads .

  • –foreground
  • –background

Similarly you can use the \watch command to execute the reports in loop .

All good, now I am going to show some examples,

  1. How to find the top three MySQL threads which consuming more memory for the particular user ?

tid : thread id
cid : connection id
memory : the number of bytes allocated by the thread
started : time when thread started to be in its current state
user : the user who issued the statement, or NULL for a background thread

cmd : \show threads –foreground -o tid,cid,user,memory,started –order-by=memory –desc –where “user = ‘app_user'” –limit=3

2. How to find the blocking and blocked threads ?

Consider I started the below transaction in a terminal 1 but not committed ,

At terminal 2, I am trying to update the same value ,

root@localhost:sakthi>update sakthi_j set id=10;

now, lets execute the \show with the required options ,

tidle : the time the thread has been idle
nblocked : the number of other threads blocked by the thread
nblocking : the number of other threads blocking the thread

After commit the transaction there is no blocking transactions . Make sense ?

cmd : \show threads –foreground -o tid,cid,tidle,nblocked,nblocking,digest,digesttxt –where “nblocked=1 or nblocking=1”

3. How to find the top 10 threads, which used huge IO events ?

ioavgltncy : the average wait time per timed I/O event for the thread
ioltncy : the total wait time of timed I/O events for the thread
iomaxltncy : the maximum single wait time of timed I/O events for the thread
iominltncy : the minimum single wait time of timed I/O events for the thread
nio : the total number of I/O events for the thread

cmd : \show threads –foreground -o tid,ioavgltncy,ioltncy,iomaxltncy,iominltncy,nio –order-by=nio –desc  –limit=10

Like this way, you can find more details about query statistics , JOIN informations , system resource utilisation etc …

I hope this blog will helps someone who is looking MySQL Shell for effectively handle the MySQL server . Will come up with my next blog soon …

Thanks !!!

Design a site like this with WordPress.com
Get started